Wednesday, November 30, 2016

Painting The Walking Dead: All Out War - Zombies Part 3

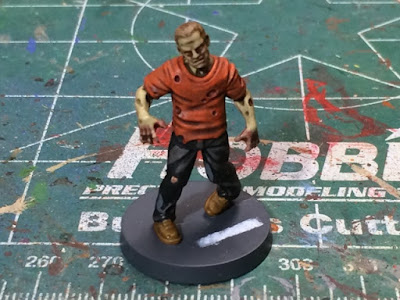
Another Zombie on the paint table.  This is my last zombie from the base box and Kickstarter game booster.

This one looked like she was at the gym when she was attacked so I painted up her in a simple tan sweat suit.  I'm pleased with how this model turned out.


My collection of zombies has a consistent look, but still feel like a horde of zombies.  I'll share some pictures of the whole group in a future post.

What do you think of this model?

Monday, November 28, 2016

Painting The Walking Dead: All Out War - Parts 1 and 2

I thought I would try my hand at putting together some videos to share my efforts of painting my models for The Walking Dead: All out War.

Here is my first video.  I set up my camera and taped my process.


This is not the best video I've ever watched, but you do get the information on how I painted the model.  I'm pleased with the look of the models that I have completed and they paint up pretty quickly.


After my not so impressive first painting video, I tried again.  After two failed attempts that I couldn't post, I came up with this format.  I think this is much better and gives the same info that was in the first video, but has a much shorter run time.


I will make more videos as I finish up the last couple of zombies.  I'm also planning on sharing my efforts to paint the survivors.

My hobby is gaming.  I like to paint models, and make terrain.  Making videos is still new to me, but I am enjoying learning this new process.  I've got a lot to learn, but I will do my best to keep the videos worth your time.  I want you to enjoy them and find them helpful.

Sunday, November 27, 2016

Imperial Skies - Turkish Fleet - Part 1

I previously posted about my first attempt at painting models for Imperial Skies.  You can read all about it here.

Muin-I-Zaffer Class Dig Cruiser
Now that I have colors picked out, the rest of the fleet should be easy to finish up.

With a couple of cruisers painted, I wanted to paint some patrol ships.  I figure a cruiser and a couple frigates will give me a decent starting force for a few test games of Imperial Skies.

The small ships at the bottom are Keyk Class Patrol Digs.  The slightly bigger ships at the top are Yarhisar Class Fast Torpedo Digs.  The Yarhisar will be painted at a future date.


Next I needed to decide how I was going to mount them on the stands.  I drilled 2 holes in the bottom of the ship and then bent a paperclip so it would fit in the holes.  I filed a notch into the top of the flight stand and glued the paperclip in place.


This isn't going to be how I mount all the ships.  It is just too fiddly.  I decided to put in an order for some CorSec Engineering stands and mounts.  These appear to be a pretty slick option, but they are a bit pricey.  I hope I get them soon so I can try them out on my next batch of ships.

I followed the same pattern for painting these ships as I did for the cruiser above..

I started with a spray coat of light brown and applied a wash of Agrax Earthshade.  I painted the structure neutral grey and highlighted that with stonewall grey.


The turret was painted black and the smoke stack was painted white.


The smoke stack got a dot of black and the windows were painted blue and highlighted with a light blue.


Quick and easy paint jobs are my specialty.


I still need to figure out some markings for the tail fins.  I got some flags along with my order from Brigade Models, but they are too big to fit on the tail fin of these models.  I tried one on the side to see how it looked.  I was unimpressed.


Instead I thought I would paint the tail fin red and free hand a moon and star.


Not perfect, but I like the look.  Any ship that doesn't have a flag on a mast will have the tail fin painted.


The completed squadron is now ready for battle.

Stay tuned to see how this fleet grows.

Tuesday, November 22, 2016

African Tribes for Congo

My gaming group has been enjoying Congo - Adventures in the Heart of Africa.

So far, I've been borrowing models from my friends who already had all the models we would need for our games, but I wanted to put together some forces of my own.

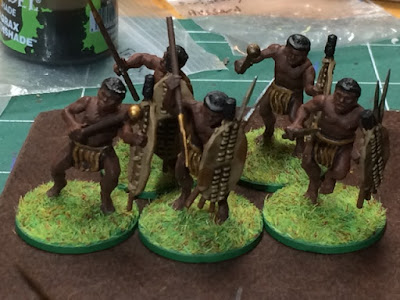
So... I dug out some old Zulu models (that I had started painting up for some unknown project) I had in a box and did a little re-basing and painted up some shields.  These will work well for several factions and can be used for young warriors or married warriors.


I also have some masked warriors that I got from Old Glory some time ago.  These have also been re-based, but still need some flock.  I think one of these will be serving as my witch doctor and the others can be fanatical warriors.


Next up will be some heroes to go along with these.  I'd also like to paint up some models with muskets/rifles and bows to mix up things a bit.

Age of the Wolf - A SAGA campaign - Part 1

My local game group has been working our way through the new campaign system for SAGA that was published in the Age of the Wolf supplement.

I believe we have 7 players and made a few tweeks to the system to limit the number of games we would have to play in each season.  Instead of each person choosing to raid or campaign against a specific person, we all just choose what we will do (raid, campaign, or defend) and send them to Randy who is organizing the campaign.  I pairs us up based on who sent the info in first and we play one game based on those pairings.  We are doing a single season each month.

I started the campaign with a band of Scots.  I was pleased with my roles for the leader's traits.  However, things didn't go so well for him.

In the first season I decided I would campaign.  I was paired off against Bill.  We played The Burh scenario with my force attacking the wall.  The game was going okay, but I let my pride get in the way and made some stupid mistakes and instead of winning the game, I lost the game and my warlord was killed during the game.  When we rolled to see what happened to my Warlord after the game, it turned out that the wounds he suffered were in fact terminal.  We held a beautiful service for him.

Oh what a fool!  It was a good reminder to stay focused on mission objectives.

I decided to create a new warband and went with Scots again as that is the only force that I have.  (This isn't legal in the rules as written.  If you want to create a new warband, you are supposed to pick a new faction, but we are allowing it.)

In the second season, I chose to defend.  After the beating I took in my first game, I was hoping to bulk up my forces a little before heading out with my new war band.  I was paired against Randy who was also defending, so no battle for me this season.  I was actually hoping to get a game in with my bolstered forces, but the fates can be fickle.


In my third season, I decided to go on another campaign.  This time I was paired off against Joe and his mighty Viking warband.  We played The Hazel Wands scenario.  I lost the challenge and Joe took the advantage and planned to beat me into submission.  Joe had some great saves in the game, which meant I had to spend way to much time fighting his levies.  At the end of the game, I had defeated his whole warband, but only had a handful of models left in mine.  It was a very bloody battle, but I did manage to take home a win.

Next up I will be facing Neal and his Anglo-Danes.  Let's see how brutal those Dane axes really are.

The Walking Dead: All Out War

Mantic's latest release is The Walking Dead:  All Out War.  I've read some of the graphic novels and watched the first couple seasons of the show.  I'm a fan of zombies and enjoy both the show and the book.

I was tempted by the Kickstarter for the game, but decided against backing it.  However, my FLGS backed it at as a retailer and they got their copies of the game a couple weeks ago.  The models look pretty good and the game play doesn't look to bad, so I decided to pick up a copy.

I've flipped through the rule book, but haven't read through it all.  The models look so good, I couldn't help but start painting them.  I'm not doing anything special with these.  I want a basic paint job so I can get them to the table quickly.

I've already got 5 walkers painted and all the rest of the models are primed and ready for their turn on my paint table.


I also picked up some die cast models at my local hardware store to replace the cardboard terrain cars.


I will make some barricades, as well, to replace those cardboard tokens.  I might make a custom game board at some point as well, but for now I will focus on the models.


Wednesday, November 16, 2016

Imperial Skies - Muin-I-Zaffer Class Dig Cruiser

I'm I've started painting up a few models for use with the Imperial Skies game.  This is a game of Aeronefs fighting against each other.  I've read my buddies copy of the rules and went and ordered myself a copy and some models.  While waiting for my models, I started painting a few of Doug's ships.

First up is a group of Turkish Muin-I-Zaffer Class Dig Cruisers.

I cleaned these up and added the mast and drilled a hole for the stand.  I sprayed these with a coat of light tan.  I then painted the structure with neutral grey and dry-brushed that with stonewall grey.


Next up was to wash the deck with Ogryn Flesh, the balloon area with Agrax Earthshade, and to pick out the guns and turrets in black.


Next, I painted the mast with Oak Brown, the smoke stacks white, and painted the windows deep blue.


Finally, I added a bit of crystal blue to each window.


I like how these have turned out.  The first model took the longest; mostly to decide on colors.  After I had the colors set, the rest painted up pretty quickly.

Next up will be some smaller patrol nefs.

Wednesday, November 9, 2016

So many Rhinos, but still not enough.

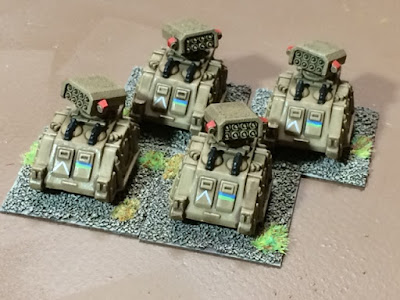
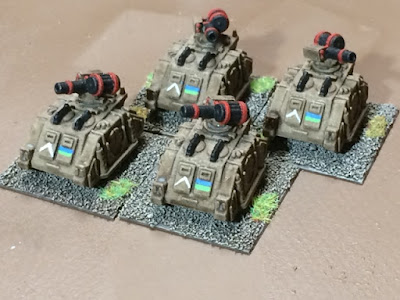
I've been hard at work on adding some vehicles to my Epic 40k Space Marine force.

Rhinos are a staple of the army and I want to be sure I have enough.  I've painted 19 that can join my existing forces.  (I'm not sure why I did 19 and not 20?)


I've also added a few more Whirlwinds to bolster my artillery division and a couple Hunters to add some AA support.  The Whirlwinds and Hunters were made from a Rhino and some add on parts I got from Shapeways.


I'm pleased with the results and now need to paint up more Space Marine infantry stands to fill all the Rhinos.

I've also got a batch of 12 predators on the paint table.  They have been base coated and washed and are ready for the details to be painted.

Game board/mat test #1

Terrain is important for game with toy soldiers.  I continue to work on my collection for the various games that I play, but I found one item that seems to be lacking in my collection.  A game mat.

Normally, I just throw down a green or brown sheet and then place my terrain on that, but I've started to think I need to upgrade.  There are a number of nice looking options available for sale, but I've seen quite a few nice options for the DIYer.  I thought I would test out some ideas and share them with all of you.

Stupidly, I failed to take pictures of the project at different stages, so only have the final work to show you.

For this test, I wanted to texture some canvas and then add some paint.  I've a couple of friends that play DBA and use 24" x 24" painting canvases for their boards.  They have just painted the canvases green and brown and they work well and are very functional, but I wanted to add a bit more detail.

For this test, I picked up a 12" x 12" canvas and some tubes of caulk.  I already had some bottles of cheap craft paint to paint the finished product with.

I applied the caulk to the canvas and spread it around with a putty knife.  I wanted a fairly even coat, thick enough that you couldn't see the canvas texture, but not super thick.

After the layer of caulk was applied, I let it dry just a bit, then took a sponge and used that to add some texture.  I just dabbed the sponge all over the canvas and lifted up.  This gave an interesting texture and made sure that you couldn't see the lines from the putty knife.  I let this dry a bit more and then used the putty knife to knock down the texture a bit.  I just ran the putty knife over everything very lightly.  I didn't want to kill all the texture, but I did want to make sure the surface was pretty flat.

I let the caulk dry completely and then put two of coats of a dark brown (burnt umber) on the canvas. It took two coats to get a solid coat down.  Once that dried I applied a dry brush of tan over the whole canvas.  It was a bit too light, so I went back and added a second (slightly) heavier dry brush of the tan.

12" x 12" board

Close up of the texture

The board with some buildings and troops

"I wonder what's on the other side of these buildings?"


I'm not completely happy with the outcome, but I'm not upset by it either.  I'm trying to decided if I should tone down the color with a heavier dry brush of the tan or if I should add some flock to the board.  I think the flock will work alright on these canvases, but I have plans to do a large sheet (4' x 6') at some point and I don't think I will be able to flock that because it won't hold up when rolled.

I'd like to hear what you think of this?  Does it need more color?  Should I flock it?  Would it be better to paint on some green instead of using flock?